Monday, December 17, 2012

Gettin’ Krafty With It, Giveaway Winner, And My Christmas Tree (Whew!)

I realize you haven’t heard much from me lately.  This time of the year always gets really busy.  The kids had their last week of school and are out for Christmas vacation.  There has been something different going on everyday! I have enjoyed watching them perform, going to Christmas parties, shopping, and just being able to see them more.  Given the tragedy in Newtown, CT, I have no regrets. There is nothing worth more to me than them.

I do need to make an announcement!  Kyra of Racks & Mooby, you are the winner of the Mrs. Smith’s giveaway!  You will receive a coupon for a free Mrs. Smith’s Signature Deep Dish Pie and a $50 Williams-Sonoma Gift Card!  Please email me with your mailing address and I will get this right out to you!  Congratulations!!!!

Finally, I want to show you my Christmas tree!
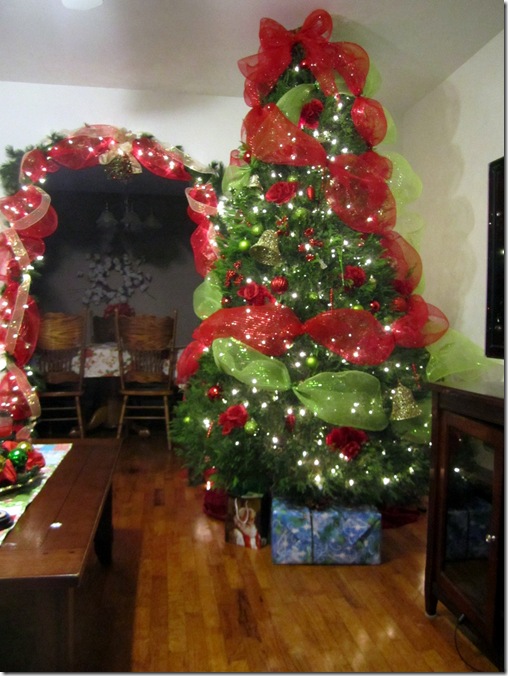
Red Roses Christmas Tree

Isn’t it pretty? 

 Tree With Lights
I decided to decorate in a red and apple green color scheme. The theme was red roses.  I came up with the idea after scoring these little rose clusters for 25 cents each at Walmart!  I got a ton of them. 

Red Roses Christmas Tree Decor

Then, I just had to dress it up with lots of red and green deco mesh. 
Deco Mesh Christmas Tree

I am in love with that stuff, it is so fluffy!  I used lots of red and green ornaments and a few glittery picks here and there.  I also added a few gold bells, violins, etc.
Christmas Tree  with Roses
       For my doorway, I made a lighted garland. 
Deco Mesh Garland Doorway

Red Deco Mesh on Garland
I used red deco mesh and gold ribbon and placed a glittery ball of mistletoe in the center. 
Mistletoe
It is the perfect spot to steal some "sugar"!
Lit Garland

Tree and Garland
I guess you could say my decorations are romantic, but hopefully not too much!  I do have three guys here!  The tree itself is huge, especially for my small living room!  I wouldn’t have it any smaller though!
Deco Mesh Decorated Tree

Christmas Tree

My Christmas Tree
Now, on to the link party!  I am sorry that there are no features this week since we didn’t have a party last week.  Feel free to link up as many things as you like, even older posts!  I can’t wait to be inspired by you! You can add a text link or this button somewhere on your blog if you are really sweet!  
Gettin' Krafty With It
Pin It!

Monday, December 10, 2012

GIVEAWAY{$50 Williams-Sonoma Gift Card & FREE Pie From Mrs. Smith's}

This is a Sponsored post written by me on behalf of Mrs. Smith's for SocialSpark. All opinions are 100% mine.

One of the best things about the holidays is baking!Mrs. Smith's Signature Deep Dish pies can give your family the made-from-scratch goodness that only comes from a pie baked with the finest ingredients.  They come in four delicious flavors:  Dutch Apple with Caramel Sauce, Cherry Pie with  Butter Fudge Sauce, Peach Pie with Cream Cheese Icing, and Pumpkin Pie with Cream Cheese Icing.  I love that they are made using real butter!  You can really taste the difference and you can serve these customized pies to your holiday guests with pride!
Dutch Apple Pie

My favorite is the Dutch Apple Pie with Caramel Sauce.  It is AMAZING!  You simply bake the pie in the oven for the correct time and then add the streusel topping and bake for 10-20 minutes more.  Then you can add the caramel sauced!  Mmmmmm.  It was like having a caramel apple.  The pie itself was probably more like the consistency of a cobbler because it was just so full of apples!


Dutch Apple Pie Slice

The pumpkin pie is delicious also.  It was really thick and I loved the flavor although it did have a little more spice than what I usually use.  The crust was flaky and buttery.  The cream cheese icing is good but it was hard to taste because we also added whipped cream.  I really appreciated that the pie was deep dish and rather large and the perfect size for my big family. 


Pumpkin Pie

The cherry pie is incredible!  It is loaded with plump, full-size cherries and bakes up with a top and bottom crust that is golden and flaky with a buttery flavor.  At first I was unsure about the butter fudge sauce but it so rich and decadent and complements the cherries perfectly!
I haven’t tried the peach pie yet but I just know it will be as delicious as the other flavors.  I haven’t been able to find it at our local supermarket.  I hope to try it soon!
Mrs. Smith’s wants you to try their Signature Deep Dish Pies for free!  They are giving one of you lucky readers a coupon for a Deep Dish Pie as well as a $50 Williams-Sonoma Gift Card so you can add something special to your kitchen!  

It is easy to enter: Just leave a comment telling me which type of pie you would try if you win.  Earn an extra entry for commenting on what you would buy with your $50 gift card!  You can also earn entries by following Mrs. Smith's on Facebook and Pinterest!  


Enter the giveaway for your chance to win and be sure to follow Mrs. Smith's Pies on Facebook and Pinterest to keep up with all of their delicious creations! You can find Mrs. Smith's Signature Deep Dish Pies at the following retailers.

MrsSmith.jpg


a Rafflecopter giveaway

Visit Sponsor's Site

Pin It!

Thursday, December 6, 2012

Duck Tape Holiday Hairbows

This is a Sponsored post written by me on behalf of Duck Brand® for SocialSpark. All opinions are 100% mine.

Duck Tape® is one of the best inventions ever.  You can just do so much with it.  I love doing crafts with it, especially with all of the fun prints it comes in now.  Then, when I found out about the new holiday line of Duck® Brand Duck Tape®, I literally rushed out and grabbed some! My head was swimming with ideas:  wrapping gifts, making Christmas cards, even festive bookmarks.
Today, I want to show you my girls’ favorite idea: making hair bows!  These are so quick and easy to make.   


Directions:
  • Measure and cut a strip of Duck Tape®.
  •  
  • Divide the tape in half and mark
  • .
  • Fold the tape over and press down carefully to remove any wrinkles. Be sure to line it up as straight as possible.  If you happen to leave any adhesive showing, just trim it away.

  • Trim another small strip of tape.
  •  
  • Pinch the large piece of tape in the center  to form a bow shape.  Attach the small strip to hold it in place.
  • Hot glue the bow to a barrette, clip, or headband.  
It only takes a few minutes and you can make so many with a big roll of duck tape.  After making the first couple of ones, I didn’t even measure anymore, I just eyeballed it.  Kids will love making their own hair bows (with your help with the hot glue, of course.)

You can add even more embellishments to them like tinsel and jingle bells for extra holiday spirit.  

Here’s another festive idea:  clip the bows onto your shoes or handbag!  

There are many fun prints: reindeer, polka dots, candy cane stripes, etc. so you can mix and match! Like Duck Tape® on Facebook for lots of other great ideas! 

If you liked this, check out my Duck Tape® Holiday Framed Art!
Visit Sponsor's Site


Sharing at some of my favorite blogs:
Tidy Mom
504Main
Tatertots & Jello
Pin It!

Duck Tape Holiday Framed Art


Here is an easy and fun way to create your own framed holiday artwork.  These will look great on a mantel or side table and add a whimsical touch to your holiday decor.  All you need is an inexpensive frame, some old Christmas cards, and some of the new holiday printed Duck Tape®.  


Cover the frame in the duck tape. Be sure to press it down all over and remove any wrinkles or bubbles.  You want to create a smooth, clean line.  Trim away any excess, especially any adhesive if needed.  Place a pretty card inside the frame.  If it doesn't fit, use a piece of paper (or even Chrismas wrapping paper) as a matte behind the card.  You can keep the card in place using a small piece of tape or a glue dot.  That's it! Super cute and super easy!  I used the penguin printed duck tape to line a frame that I had laying around.  I placed an old card inside that also featured penguins with 3D elements. 

This is a great way to add a festive touch in unexpected places in your home- like the bedroom or bathroom.  Place one in your children's bedroom or on a side table that may not usually get decorated for Christmas.  Create a gallery wall of holiday art if you have a large collection of cards.

Another wonderful quality of this craft is that it allows you to display and treasure cards from loved ones and you can reflect back on the memories of those special people every time you see it.  I love anything sentimental, especially during the holidays. I must admit, I have saved every card ever given to me so I could make quite a collection of these!  


I have another great Duck Tape project coming soon so stay tuned!
I will be sharing this with some of my favorite blogs:

Pin It!

Monday, December 3, 2012

Gettin’ Krafty With It

It’s beginning to look a lot like Christmas!
Except, I don’t have a Christmas tree yet!  I have pulled out all of the decorations, bought some new ones, came up with a whole new theme and can’t wait to get started…
I wanted to get one right after Thanksgiving but we had birthdays going on as well and it was just too hectic. Then, we were going to get a tree this weekend and one of our children was not at home so we didn’t want to leave her out.  We all go to the Christmas tree farm as a family and pick out the tree and cut it down.  It’s our little tradition.  The kids get candy canes and we listen to Christmas music all the way home with the tree on top of the car. 
So, hopefully, this week we will have our tree!  It is better to wait anyway since we get a live tree and we want it to still be alive on Christmas! 
I am eager to see your Christmas trees though and other holiday (& non holiday) projects! 
Here are a few from last week:

Diana Rambles made this mint dirt pie. Mint and chocolate are so good together and perfect for a holiday treat!


Dry Shampoo recipe (beautytips4her)

Beauty Tips 4 Her shared this recipe for dry shampoo spray.  This will come in so handy in between washings, especially during this busy season! 


Howling Liz embroidered this adorable Russian nesting doll or matryoshka as a gift for a friend.  I know she will be very happy to receive it.


Kaminski’s Creations made this Christmas Card Holder.  What a stylish display!
Paperseedlings demonstrated her technique for faux cloisonné ornaments on Christmas cards.  I can’t wait to try this myself!


Shades of Safhire -Stained Glass Crocheted Scarf
Shades Of Safhire shared this beautiful stained glass style scarf. I really like this pattern.


If you were featured, go ahead & grab this button:


Featured At Krafty Kat


If you are joining the party, I would love for you to add this button to your blog or place a text link to let everyone know!
Gettin' Krafty With It


Thanks to all of you for coming to the party and sharing your ideas!  
If this is your first time joining us, I'm so glad you are here!  You've come to the right place for linking up all of your creative ideas, helpful tips, fun recipes, parties, decorating and for finding lots of inspiration!
Why not become a follower so you can keep up with all of the Krafty-ness?

You can find Krafty Kat in all of the social hot spots (Facebook, Twitter, LinkedIn, Pinterest, etc.)! You can subscribe to the blog using your favorite method (feed, email, GFC, Linky Tools, whateva!)


Psst…Krafty Kat is also on 
HomeTalk now!  I am loving this new interactive site dedicated to everything  for your home!

My favorite escape right now is Tumblr where I post lots of pretty, inspiring pictures and share my more dreamy, whimsical side! 

Now, time to get Krafty! 


Pin It!

Dollar Store Gift Box Decor And Deco Mesh Garland


Gift Box Decor


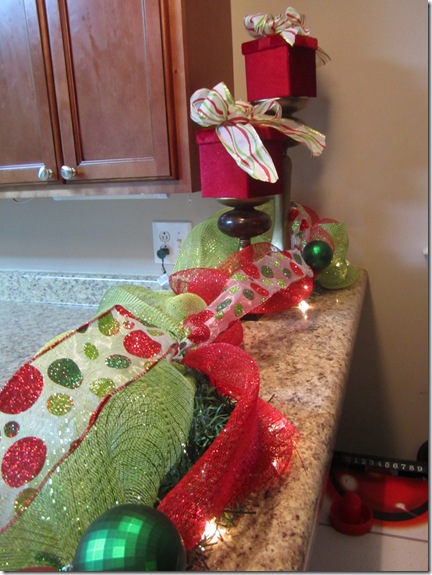
I added a little bit of Christmas to my kitchen using red velvet gift boxes from the dollar store. I made some bows using a festive ribbon (also from the dollar store).  I hot glued the bows to the top of the boxes. 

Bow On Gift Box Decor


Then, I found a pair of candlesticks that I already had and put them on them to give them some height and interest.  I put these at one end of my counter. These would also look great on a table or mantel.
Dollar Store Gift Box Decor

I needed something festive for the rest of the counter but I was already using all of my other decorations in other places.  To fill in the space on the rest of the counter, I took a cheap lighted garland from Dollar General (I’ve had it a couple of years) and added deco mesh and ribbon.  It was the perfect solution to add a lot of color and holiday fun to the room.
  {I apologize for the poor photos but I took these at night and had the overhead pendant lights on which created a bit of a glare.} 
Deco Mesh Garland On Bar

 I secured the deco mesh and ribbon to the garland with sparkly pipe cleaners (glitter sticks).

Securing Deco Mesh
I also hot glued a couple of leftover green ornaments to it and added a bow at the end. 
Bow On Garland

Lighted Deco Mesh Garland at Night

 I love the fun, whimsical look it adds to my kitchen. 

Deco Mesh Garland Kitchen

I also have a little figurine with snowmen to countdown the days until Christmas. 

Christmas Countdown Snowmen Figurine 
 Don’t you just love decorating for Christmas?
Pin It!