Friday, November 30, 2012

Easy Christmas Centerpiece Idea

Here is an easy & inexpensive centerpiece idea.

Easy Christmas Centerpiece
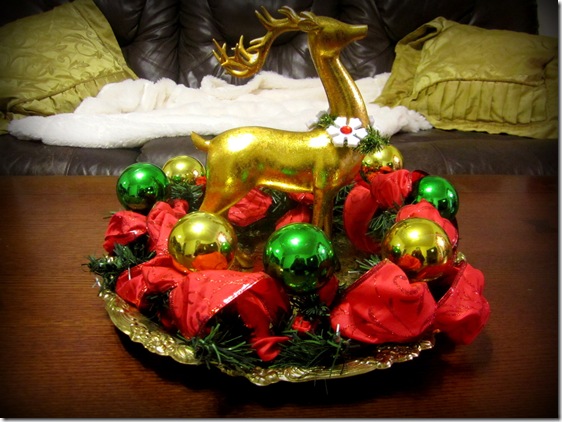
 I took a brass plated charger from the thrift store and placed a dollar store evergreen wreath over it.  I added some festive ribbon to the wreath by making loops and securing the ribbon with the branches of the wreath.
Ornaments and Ribbon
Then, I took some shatterproof ornaments and removed the top where you hang it and just attach it to the branches.  I got that tip from Savvy Seasons.  I alternated green and gold ornaments around the wreath.  These were just leftover ornaments that I won't be using on our Christmas tree. 
Remove Hangers from Ornaments
In the center I placed a golden reindeer I bought for 50% off at Rite Aid.  I accidently dropped him as soon as I walked out of the store with him and broke his back leg but luckily, he can still stand. I am so clumsy sometimes!  I added the bling around his neck from a piece of an old homemade ornament.  It is a piece of green tinsel with snowflakes with red stones in the middle.  It fit him perfectly.
Christmas Centerpiece
You could easily recreate a similar centerpiece in your own color scheme and holiday style.  Just place a dollar store wreath on a tray, plate, mirror, or other object and place any other Christmassy item in the center such as an angel figurine or a candle.  Then embellish with leftover ribbon, ornaments or however you like.  
Christmas Centerpiece On Table 
 I think when it comes to Christmas, more is, well, more. 
Pin It!

Thursday, November 29, 2012

The Honest Company

As a mother to five children, I am very concerned about the products we use in our household. I want to make sure that the ingredients we use on the items that my kids come into contact with everyday are safe.  That includes what we wash our clothing with, our hands, our hair, and our bodies.  Ideally, these items would be natural and gentle and free of harsh chemicals.  Oh, yeah, and I’d like them to be affordable too.  That’s why I am so excited about my recent opportunity to try some of the great items from The Honest Company. 


The Honest Company offers cleaning and beauty products as well as baby items like diapers and wipes.  The company was founded by Jessica Alba.  You receive products in one month bundles that are delivered right to your door so it is a great time saver!  Of course you can purchase individually or in 3 or 6 month supplies as well.  In the Family Essentials Bundle, you would choose 5 products from a list of everything from bubble bath to dishwasher pods.  They also have bundles for buying diapers and wipes.  The designs on the diapers are really cute!  Kinda makes me wish I still had a baby to wear them.  OK, not really, but if I did, these would be the diapers I would choose.  They are naturally biodegradable and plant based with no harmful chemicals of any kind.  I think the only thing that would equal would be cotton cloth diapers. 
The Honest Company Trial
 I was able to sample some of the personal products like the face and body lotion which felt really nice on my skin.  It is a blend of organic olive oil, calendula, and organic aloe and fragrance free.  My skin gets really dry and it was instantly soothed and softened.  I also sampled the hand soap which had the clean scent of organic lemongrass as well as the shampoo & body wash which was also tear-free so it was very gentle and had an orange vanilla scent.  The laundry detergent was the only household cleaner that I received but it worked well and was fragrance free and safe for using in front loading and/or HE machines.  I received the healing balm which can be used on irritated skin such as diaper rash.  It had a bit of a peculiar smell and felt a little greasy but would probably work well for protecting sensitive skin.  My favorite product was the lotion and I am eager to check out more of their items. 
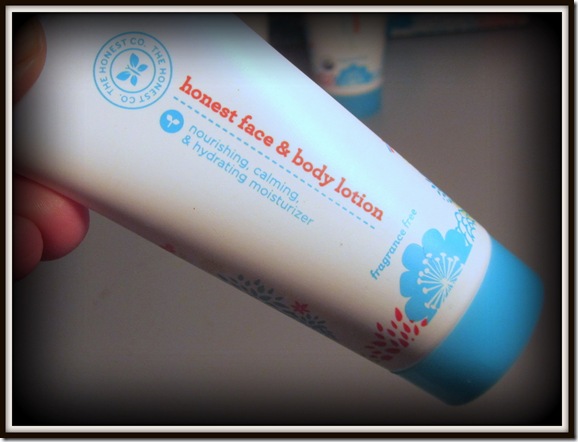
Honest Lotion

The Honest Company was started by a mom and a dad who, like many modern parents, were increasingly worried about products made with questionable chemical ingredients. But the alternatives they found were often expensive, inaccessible, bland, or ineffective. In response to this clear need for something better, they created The Honest Company to ensure that parents (or anyone for that matter!) could easily find natural and non-toxic eco-friendly products that are beautiful, effective, and affordable. From customized product bundles to diapers and wipes to an ever-expanding line of cleaning and personal care products, you can find everything you need at Honest.com and have it delivered directly to your front door.
Give it a try! Click here to become a member of The Honest Company community and start your free trial today.
This is a sponsored post written by me on behalf of The Honest Company. The opinions and text are all mine.

Pin It!

Wednesday, November 28, 2012

White Doves And Feathers Christmas Tree

I wanted to show you the Christmas tree I have in my office/craft room that I actually got from the recycling center.  It is a slim 7 foot tree and it had lights already on it (not the prelit kind) but some of them are not working.  Someone must have gotten an upgrade but this one is perfect as a second tree for me. 
Christmas Tree White Decorations
 I put it up recently (ok, ok... honestly, I put it up a week before Thanksgiving!) and decided to decorate it all in white after making my faux snowballs vignette which is in this same room.  I used some large snowflake ornaments (from Dollar Tree) I had from last year along with some smaller ones I have had for years.  Then, I added white and silver glass ball ornaments and a few other white angel ornaments I had in my stash.  I also placed a few white spray painted pine cones in the branches.
Christmas Tree White Decorations5
Christmas Tree White Decorations6
Then, I decided to get some little white doves to look like they were flying all around the tree.  I ordered them from Create For Less.  To go with the dove theme, I ordered some white ostrich feathers from ebay and placed them inside the branches to give it a soft, snowy look. 
Christmas Tree White Decorations11
Christmas Tree White Decorations2
I didn’t have a white tree topper so I left it plain at the top but I did add a few branches near the top that I found in my backyard and just spray painted white.
Christmas Tree White Decorations4
 I love the white decorations and the doves.  It just brings a sense of peacefulness to the room. It’s not too bad for a tree that was destined to be trashed. If I end up doing anything else to it, I would just add more lights and feathers.  I may add a little banner to the top that says “Peace On Earth”.  That would be cute.  However, this is not my main tree so most of my time/energy will be going into the live tree we will be getting in our living room. 
I have already decorated the room and gotten everything together in there.  All I am waiting on is the tree and we are supposed to go get it this weekend.  It will be bright and colorful but you’ll just have to wait to see it. 
Christmas Tree White Decorations10

Christmas Tree White Decorations8
Pin It!

Tuesday, November 27, 2012

Snowman In A Jar {XL Size}

Snowman In A Jar {Krafty Kat}

As I was cleaning out my kitchen cabinets, I stumbled across this giant pickle jar and I just knew right away that it would be perfect for a fun Christmas project!  I decided to make a snowman in a jar.  As if he had been captured and able to live forever inside this jar.  It is sort of like a snowglobe except I didn’t want to turn it upside down since it was so big and heavy.  It is almost as tall as a 2 liter soda! 

 IMG_6420
I made a snowman from polymer clay and then baked him in the oven. 
IMG_6366

 While I waited I boiled a big pot of water and painted the jar lid white.  When the snowman had cooled, I painted his button eyes and carrot nose as well as his hat and coat buttons.  I cut a piece of felt to make a scarf.  He seemed to like it quite well.
IMG_6378


IMG_6379
Then I glued him to the bottom of the jar using epoxy glue.  I added lots of fake snow and glitter.  Then I added boiled water and a few drops of baby oil to help the snow fall a little slower.  I have seen people use distilled water and glycerine, baby oil alone, etc.  I have also read that people have used clear dish soap to replace the glycerine.  I just used what I had on hand.  I added some more epoxy glue to the ring around the jar lid and secured it on.  Then, I added a cute little bow with a little jingle bell.  I also placed this little piece of an old Christmas card with the greeting “Happy Holidays” on the top to add a little cheer.
 Snowman
I just love him!  It is like I have captured a little magic inside this jar along with the snowman! 

Clay Snowman
He is definitely a great conversation piece and adds a touch of fun and whimsy wherever I want to display him. 
Snowman Jar

One thing I noticed though which is probably due to the fact that I didn’t seal the clay is that his bottom part (his butt) seemed to swell during the first day.  I was worried he would eventually swell to the size of the entire jar and then he would seem more like a scary specimen than something cute for Christmas!  But it seemed to reach a stopping point and he just looks like a big, happy snowman! 


Linking Up:
Home Stories A to Z
Homework
Smart Schoolhouse
Someday Crafts
Coastal Charm
Savvy Southern Style
The Rustic Pig
A Glimpse Inside
Shabby Creek Cottage
Beyond The Picket Fence
My Romantic Home
Little Becky Homecky
Be Different Act Normal
Young & Crafty
Flamingo Toes
I Heart Naptime
Pin It!

Monday, November 26, 2012

Gettin’ Krafty With It

I hope you all had a very Happy Thanksgiving!!! 

 I had a wonderful Thanksgiving, followed by crazy Black Friday shopping, six teenage boys overnight for my son’s birthday, then more shopping and partying for my stepdaughter’s birthday.  I’m one worn out woman!

  I still managed to do some Christmas decorating and crafts (I’ll be showing you soon)!  I also got to do a little shopping for myself because tomorrow (Tuesday) is my birthday!  I don’t know how we ended up with 3 family member’s birthdays all in a row but it makes for one endless celebration at our house in November! 

Anyway, with all of this going on, I have had very little time for blogging and visiting my favorites!  I am missing you guys!  So, let’s get down to it and let me show you some of the highlights from last week:


I love this Winter Wispy Wreath from Made In a Day.  The little cardinals are so adorable and I like that you can use this wreath all winter long, not just at Christmastime. 


Aimee from Twigg Studios never ceases to amaze me.  This time she has created these little Winter Wonderland Baubles.  I think I need about fifty of these. 


One of the best things about cooler weather is getting to enjoy a big bowl of yummy soup!  There is nothing like a good, hearty soup to warm me down to my bones and this Spicy Sausage & Barley Soup from If I Had A Million Hours looks like just the ticket! 


shower-curtain-ring-Christmas-tree

Thrifty Rebel made this beautiful tree.  What is even more amazing is what she used to make it:  shower curtain rings!  Isn’t she clever?


I think this Burlap Candy Cane Wreath from Life On Lakeshore Drive is gorgeous!  I love the ruffled stripes and the candy cane shape adds the element of the unexpected to the door! 


If you were featured, go ahead & grab this button:


Featured At Krafty Kat


If you are joining the party, I would love for you to add this button to your blog or place a text link to let everyone know!
Gettin' Krafty With It


Thanks to all of you for coming to the party and sharing your ideas!  
If this is your first time joining us, I'm so glad you are here!  You've come to the right place for linking up all of your creative ideas, helpful tips, fun recipes, parties, decorating and for finding lots of inspiration!
Why not become a follower so you can keep up with all of the Krafty-ness?

You can find Krafty Kat in all of the social hot spots (Facebook, Twitter, LinkedIn, Pinterest, etc.)! You can subscribe to the blog using your favorite method (feed, email, GFC, Linky Tools, whateva!)


Psst…Krafty Kat is also on
HomeTalk now!  I am loving this new interactive site dedicated to everything  for your home!

My favorite escape right now is Tumblr where I post lots of pretty, inspiring pictures and share my more dreamy, whimsical side! 

Now, time to get Krafty! 
Pin It!

Sunday, November 25, 2012

Pumpkin Pie With Truvia® Baking Blend

This is a Sponsored post written by me on behalf of Truvia® Natural Sweetener for SocialSpark. All opinions are 100% mine.

Visit the Truvia® website for more tips and information on Truvia® Baking BlendThe holidays are here and that means time for baking lots of goodies!  Cakes, pies, cookies, and all of the things that make these special times sweeter.  If  you want to be able to indulge in delicious desserts but still cut back on sugar, let me recommend Truvia® Baking Blend.  Truvia® Baking Blend comes in pourable 1.5 pound bags and is a blend of Truvia and sugar.  It gives you that genuine sugar taste and texture for all of your recipes but has 75% fewer calories and twice the amount of sweetness as sugar.  One 1.5 lb. bag is the equivalent of a 3 lb. bag of sugar. 

I want to share with you a recipe for making a delicious pumpkin pie using Truvia® Baking Blend.  The pie still bakes up yummy with the same moist texture but this one has 2/3 less sugar than one using regular sugar.  This can be your little secret!  Try it and see if your family can tell the difference.  They can enjoy a mouth-watering, home baked treat and you’ll know you’re helping them reduce their sugar intake! 


Pumpkin Pie


Ingredients

Pastry shell for 9" pie
1 can (15 ounces) pumpkin
1 can (12 ounces) evaporated fat-free milk
3 eggs
13 cup Truvia® Baking Blend
1 tsp vanilla
112 tsp pumpkin pie spice
18 tsp salt


Instructions

1. Preheat oven to 400° F.
2. Prepare your desired pastry crust.
3. Mix pumpkin, milk and eggs until blended. Add additional ingredients and mix until uniform.
4. Add mixture into prepared pastry crust.
5. Bake for 35 to 40 minutes or until a toothpick inserted into center comes out clean.
6. Cool completely on wire rack.
7. Add whipped topping if desired.

Topping suggestion:
Make your own whipped cream by whipping 1 cup cold fresh cream, 1 Tbsp Truvia® Baking Blend, and 12 tsp vanilla extract. This will alter nutritional content.

Nutritional Facts:


Calories, 180; Total Fat, 7g; Saturated Fat, 2.5g; Trans Fat, 0g; Cholesterol, 65mg; Sodium, 170mg; Total Carbohydrate, 26g; Dietary Fiber, 2g; Sugars, 5g; Erythritol, 3g; Protein, 6g; Vitamin A, 140% DV; Vitamin C, 4% DV; Calcium, 10% DV; Iron, 8% DV.


* This pie has 180 calories and 5 grams of sugar per serving as compared to a sugar-sweetened pie that has 220 calories and 15 grams of sugar per serving.


What favorite Holiday recipe can you recreate using Truvia® Baking Blend?  Leave a comment on this post! 

Visit Sponsor's Site

Pin It!

Monday, November 19, 2012

Gettin’ Krafty With It

Busy, busy, busy!  Are you as busy as me?  It seems like time speeds up the closer it gets to the end of the year!  Maybe it is just me but there is never enough.  So, I apologize for not commenting on every link from last week’s party!  I have just been so busy!  Here are a few posts that jumped out at me though:


Liz Marie’s amazing deer head mounted on pallet wood.  It is just so striking and beautiful.  What a great idea, especially at this time of the year!


Creative Chaos made this lovely DIY Peter Pan Collar and even though her daughter thought it was “embarrassing”, she looks beautiful modeling it, doesn’t she?


Twigg Studios made these amazing acorns using drop cloths and leaves! Such a creative way to add charm to her fall decor.


image
Half Baked Harvest shared several drool-worthy recipes, including this one for Pecan Pie Brownies.


Simply Creating Home made this absolutely stunning fall wreath with acorns collected from her grandparents home.  What could be more special?


If you were featured, go ahead & grab this button:


Featured At Krafty Kat


If you are joining the party, I would love for you to add this button to your blog or place a text link to let everyone know!
Gettin' Krafty With It


Thanks to all of you for coming to the party and sharing your ideas!  There were almost 100 link ups last week!  YAY!  
If this is your first time joining us, I'm so glad you are here!  You've come to the right place for linking up all of your creative ideas, helpful tips, fun recipes, parties, decorating and for finding lots of inspiration!
Why not become a follower so you can keep up with all of the Krafty-ness?

You can find Krafty Kat in all of the social hot spots (Facebook, Twitter, LinkedIn, Pinterest, etc.)! You can subscribe to the blog using your favorite method (feed, email, GFC, Linky Tools, whateva!)


Psst…Krafty Kat is also on
HomeTalk now!  I am loving this new interactive site dedicated to everything  for your home!

My favorite escape right now is Tumblr where I post lots of pretty, inspiring pictures and share my more dreamy, whimsical side! 

Now, time to get Krafty! 
Pin It!

Saturday, November 17, 2012

Blue Dollhouse Redo Part 1

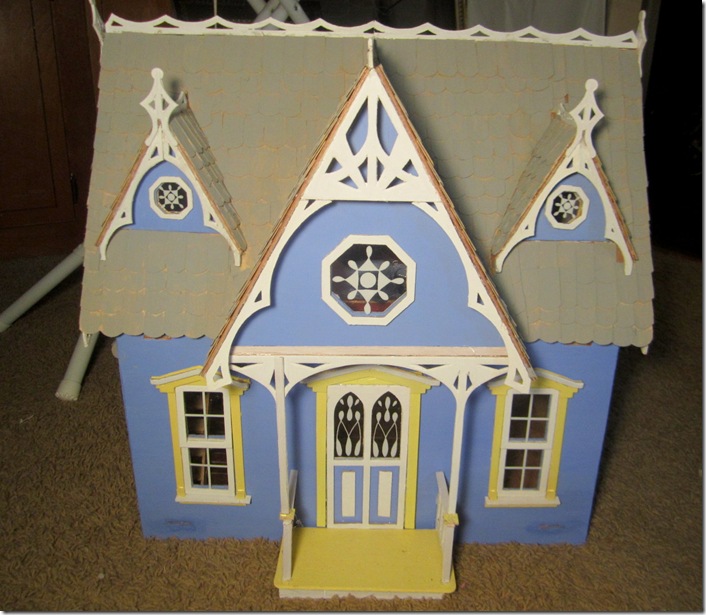
One day, the strangest, luckiest thing happened.  Someone left not one, but two dollhouses at the recycling center where we take our trash and stuff.  They were unfinished inside and needed a little repair here and there but they were almost identical and perfect for my two little girls. It was like it was meant to be that I find them there.  They have been playing with them “as is” for a while and I finally decided to do a little work on them. 
Two Dollhouses
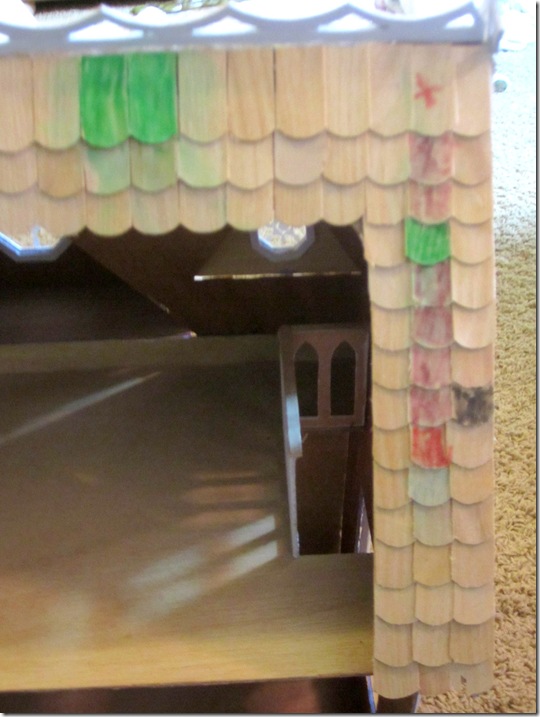
Today, I will be showing you the first part of the renovation of the blue house.  The first thing I did was repaint the shingles. 

Dollhouse Makeover

One of my girls decided to start working on them herself.  Yes, she is her mother’s daughter.
Shingles

Flooring Samples

For the flooring, I went to Home Depot and grabbed a ton of vinyl and hardwood floor samples.  I hot glued a piece of vinyl in the kitchen to look like granite. 

Kitchen Flooring
The next thing I did was cut some more vinyl into little two inch squares for the bathroom.  I hot glued the “tiles” and then used white puff paint for grout. 
Bathroom Floor (Dollhouse)

Then I added a wall which was missing using two hardwood floor samples. I clicked them together and glued to the floor. It was the perfect size. 

Bathroom

I cut some pink polka dot stationery and glued to the bathroom walls for wallpaper and painted  the rest white.   I used some pink sticker frames for scrapbooking to hang up some “art” in the bathroom which was really some floral patterns from a quilting catalog.
Dollhouse Bathroom

I made a curtain rod using a lollipop stick that I added wooden beads to the ends.  For curtains, I cut some pieces of an old receiving blanket and hot glued them around the edges and made a tiny rod pocket. 


Dollhouse Curtains Bathroom

In the bedroom, I added new carpet with some blue craft felt and hot glue.
New Bedroom Carpet Dollhouse


I also added some new furniture.  I bought some plain unfinished furniture from Dollar Tree and painted it. My daughter picked out the color. 
IMG_6352
For now, I added some blue scrap fabric to the bed to cover up the awful red checked fabric that it came with.  I hope to find some nice upholstery samples to replace it with.  Polly Pocket seems to like it though. 
bed


Dollhouse

The last renovation was in the living room. I added hardwood floors.  This was done by using the vinyl flooring samples that look like wood.  I cut them into “planks” using a box cutter.
Hardwood Floor
I measured out the planks and marked with a pencil then cut.  I didn’t cut all the way through just enough to separate them.
Snapping Floor Tiles
Snapping some of the vinyl flooring in the same manner.
I would bend them at the line and the planks would snap apart like a kit kat bar!  Then I just glued to the floor.  I had to make some small ones to fill in any gaps at the edges.
New Hardwood Floor

So, let’s see what all I have gotten done:
  • Shingles
  • Kitchen Flooring
  • Added Wall
  • Wallpaper in Bathroom
  • Tile & Grout in Bathroom
  • Artwork & window treatment in bathroom
  • Bedroom Carpeting
  • Bedroom Furniture
  • Hardwood Flooring in Living room
If this were my real house, that would have cost a fortune.  Since it was for a dollhouse, it was all free.  I think I like working on dollhouses better!
Dollhouse Flooring

There is still a lot of work left to do. More painting and wallpaper for the walls and window treatments. Come up with something for the stairs. Then, we need a lot more furniture and decor.  That will be the fun part. 

Oh, and not to mention, I have a whole other house to do as well.  I am becoming obsessed with dolls, dollhouses, and miniature things lately.  Have you ever redone a dollhouse?
Dollhouse Makeover

Linking Up:

It's Overflowing
Flamingo Toes
I Heart Naptime
CRAFT
Craft-O-Maniac
Between Naps On The Porch
Making the World Cuter
Tip Junkie
Today's Creative Blog
Home Stories A to Z
Homework

Pin It!